For several years I’ve had the dream of replicating Mary Schweitzer’s famous discovery of soft tissue remains in dinosaur bones. From one perspective it’s a fairly reasonable dream. Mark Armitage and others have already made similar discoveries. However, as an amateur enthusiast the time and particularly the budget I’m willing to spend on such a project is “somewhat lower” than these professional scientists. By “somewhat lower” I really mean “not even in the same solar system”.
After engaging in some “minor” substitutions my equipment was ready:
- A Taco Bell spork replacing a magnetic stirrer
- $0.35 Jam jars from a local second hand shop replacing beakers
- A tiny $2 dinosaur bone fragment from Ebay instead of giant T-Rex leg bone or Triceratops horn
- A cheap $209 student microscope from amazon1 that I already owned
- By holding my smart phone carefully above the eyepiece I found I could take decent pictures–eliminating the need for a microscope camera
- A postage scale that I pressed into service for weighing ingredients
- A cheap pH meter for $14, but it turned out I didn’t need it
Some items couldn’t be substituted: Pipettes2, Sodium Hydroxide3 and Disodium Ethylenediaminetetraacetic acid commonly known as disodium EDTA4. Fortunately, none of these items is very expensive. So for under $50 in supplies my experiment was ready to roll!

My Laboratory (the kitchen table)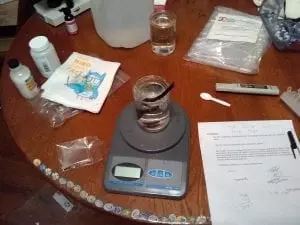
Performing the Experiment
The general idea is to place a fossil sample in an EDTA solution to dissolve the minerals out of the fossil. EDTA doesn’t bind to proteins so any soft tissue that remains after the minerals have been dissolved away should float to the bottom of my jam jar “beaker”. From there they can be collected and place on a microscope slide.
To actually perform the experiment I needed specifics. After in-depth research (i.e. a couple hours browsing the internet) I had just enough information and guesswork to throw together a set of steps I hoped would work. Since I was doing this “just for fun” that was good enough. (I did carefully research how to safely handle the chemicals. There are no shortcuts on safety.)
There are several online recipes for EDTA solution so I choose one5 and proceeded. The first step was to do math to scale the recipe from a liter sized batch to a “jam jar” batch. Much to my surprise and delight I found I had exactly enough EDTA powder to make precisely two jam jars of EDTA solution.
The next step was to mix the EDTA powder with distilled water. It makes a milky white fluid until the powder settled down to the bottom of the jar. (Which happens in just a few minutes.) Oddly, EDTA powder is an acid, but it will not dissolve into water unless the water has a basic pH of 8 or more. (If you don’t have a strong chemistry background don’t let the pH scale intimidate you. The easiest way to think of it is two scales that are connected in the middle. A value of 7 (the middle of the scale) is the starting point also called “neutral”. The bottom half (0-7) is the acidic scale. The lower the number the more acidic the chemical. The top half (7-14) is basic scale. The higher the number the more basic the chemical. The reason these two scales are placed together is if acids and bases are mixed together they like to cancel each other out. Distilled water has a neutral pH of approximately 7.6
So to dissolve the EDTA into the distilled water it must be modified from it’s original neutral pH of about 7 to a basic pH of 8. Placing pellets of Sodium Hydroxide (pH of 13!) increases the pH rather quickly. The challenge is to get the EDTA powder to dissolve, but not add in too many Sodium Hydroxide pellets otherwise the pH will go way beyond 8. More on that later…

While EDTA is considered a safe chemical to handle directly Sodium Hydroxide is not safe to touch!! I found a little plastic spoon in my kitchen that would keep my fingers safely away and carefully dropped the little pellets of Sodium Hydroxide into the mixture. Then I mixed the solution periodically with the Taco Bell spork. In my opinion the spork is one of the worst eating utensils ever invented, however it turns out to be wonderful for mixing up EDTA! The spoon portion easily stirs up the solution and the forks can slice through the EDTA powder that’s settled on the bottom to fish out any undissolved Sodium Hydroxide pellets. (On my first batch I put in too many Sodium Hydroxide pellets and had to quickly pull out the excess. To avoid that mistake on the second batch I decided to play it safe and add one pellet at a time. That seemed like a good plan. However, it takes about 10 minutes for each pellet to dissolve completely. Over the course of the next several hours I discovered it took eighteen pellets!)
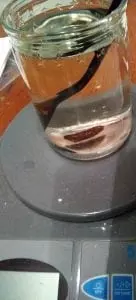
When the pH rises above 8 the EDTA powder stars noticeably dissolving. As it dissolves it starts interacting and cancelling out the affect of the Sodium Hydroxide pushing the pH of the water slowly back towards the acidic side of the pH scale. That in turn stops the dissolving process until more Sodium Hydroxide is added. Eventually the entire solution looks like pure water–then it’s time to add the fossil fragment.
Within a few hours the solution turned a dark red from the absorbed minerals and loose material was falling off of the fossil. Creation scientist Mark Armitage recommends7 replacing the EDTA solution multiple times a day or at least multiple times a week. But, since I had only enough EDTA powder to make two batches of EDTA solution I left the fossil sample in the first solution for two or three days to maximize mineral absorption before replacing the fluid with fresh solution. (In future experiments I plan to use more EDTA.)
The Results
I took some of that loose material that had started to gather around the base of the fossil and put it on a microscope slide covering it with a thin glass cover. This trapped the bits of sample material along with a small amount of EDTA solution between the glass slide and the thin glass cover. By gently pressing down on the thin cover (and releasing the pressure) I could create “currents” of EDTA solution that rapidly moved back and forth over my sample. If the material was biological it was likely to flex in the current. If it was just minerals they would most likely stay immobile or shatter.
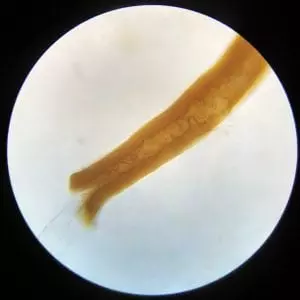
 At first all I found were mats of a brown substance. Pressing down on the slide cover either had no impact or broke them into smaller pieces. I concluded they were probably mineral chunks from the fossil that for whatever reason weren’t as easy for the EDTA to dissolve as other parts of the fossil. They fell off when the minerals around them dissolved.

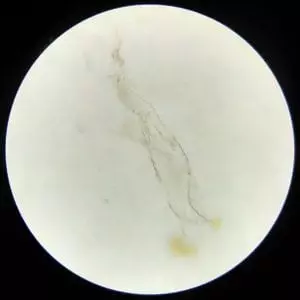
However, I began to notice faint tube like structures that seemed to be randomly covered with small filaments. Unlike the brown minerals these structures flexed easily in the EDTA currents.
Unfortunately, they didn’t look anything like Mary Schweitzer’s famous pictures. Nor did they look like any of the microscopic pictures of bone tissues the internet so kindly provides. One of them even forked in a way that didn’t make sense for a blood vessel. However, the more that the bone dissolved the more of these I found. The tubes also seemed to go through holes in some of the bits of remaining fossil material, so I concluded they must have come from the fossil. (Rather than in bits of dirt that may have remained after I washed the fossil.) It was a mystery and I was baffled.
It’s been said that scientific breakthroughs are rarely announced with shouts of Eureka! (Greek for “I found it!”8), but more often with a mumbled, “that’s strange”. While I wasn’t anywhere close to a great breakthrough, I was at least experiencing the unexpected part of science!
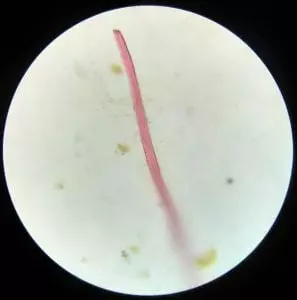
Then I came across this.
Blood cells don’t end like this.
But there is something in nature that does.
Plant roots.
Yes I was disappointed.
Not wanting to give up I kept looking at the remains and only found more roots. No soft tissue remains. Apparently my bone fragment was either too small or was in an environment that couldn’t preserve soft tissue for that long. It has been 4,500 years after all.
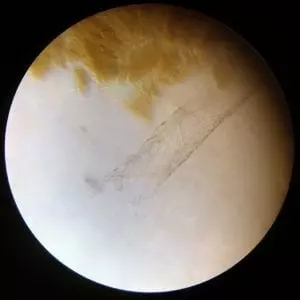
The experiment wasn’t a complete failure however. The root to the left is particularly intriguing. The brown material is unabsorbed fossil remnants. A root is growing in a little cavity down the middle of the fossil. (I’m guessing the cavity already existed and the root took advantage of it.) The mostly clear root sticking out in the bottom left quadrant. It’s hard to see, but in the top right quadrant there is a little hole in bottom of the fossilized material and a rootlet is sticking out of that.
These roots are not old. At most I would guess only a few years. It’s a little known fact that some plants love dinosaur fossils. I’ve spent a couple weeks at a creation science dinosaur dig in Wyoming and seen with my own eyes the damage roots can do to dinosaur bones in just a few years when given the chance. Most of the time roots don’t get that chance because the fossils are burred too deeply. But if the protective overburden is removed (such as an eroding hillside or by earth moving equipment) plants have an opportunity to go after the minerals supplied by the fossil. The result breaks the fossils into fragments remarkably quickly.
What is interesting is that while I’ve seen roots break up fossils, I have not seen fossils showing the same damage patterns unless a modern living plant was in the process of attacking the fossil. This means the fossils were buried below the root zone and stayed there until modern times.
While I didn’t find the soft tissue I wanted to find the invading plant roots provide their own piece of evidence. Evidence that the fact we find undamaged fossils today means they were buried deeply. Evidence that fits well with a Genesis flood. As Solomon says, “The fear of the LORD is the beginning of knowledge”9. If we start our scientific investigation with the word of God as the foundation. Whatever we find (when properly interpreted) will build on that foundation.
References
- Microsope: https://www.amazon.com/gp/product/B0094JTZOU/ref=oh_aui_detailpage_o06_s00?ie=UTF8&psc=1
- Pipettes: https://www.amazon.com/gp/product/B073WLCQWD/ref=oh_aui_detailpage_o01_s00?ie=UTF8&psc=1
- Sodium Hydroxide: https://www.amazon.com/gp/product/B077T7K9V2/ref=oh_aui_detailpage_o02_s00?ie=UTF8&psc=1
- EDTA: https://www.amazon.com/gp/product/B014AMEGYY/ref=oh_aui_detailpage_o03_s00?ie=UTF8&psc=1 (Note: This bottle was too small–had enough EDTA for approx 2 cups of solution. (Note: there is another form of EDTA called calcium disodium EDTA which I would avoid since I believe that version would have difficulty dissolving calcium). For my next experiment (not run yet) I ordered two pounds of this: https://www.amazon.com/gp/product/B07662XW35/ref=oh_aui_detailpage_o00_s00?ie=UTF8&psc=1
- EDTA recipe: https://www.thoughtco.com/0-5m-edta-solution-recipe-608140
- According to this web site water actually interacts with the air turning it just slightly acidic: https://www.vernier.com/til/1286/
- https://www.youtube.com/watch?v=RxOdzXPJpDw
- The Greek mathematician Archimedes is said to have shouted Eureka! when he stepped into a tub of water and noticed his body displacing the fluid. He realized he could use the displaced water to measure the volume of irregularly shaped objects. The volume combined with weight could give clues to the composition of the object without destroying it. In his case he wanted to determine if a crown was 100% gold as claimed by the craftsman or if craftsman had replaced some of the gold with less dense silver. https://en.wikipedia.org/wiki/Eureka_(word)
- Proverbs 1:7, KJV